Starlink, SpaceX’s revolutionary internet service, uses a user-friendly dish to link users to a constellation of satellites. Sometimes, like during severe weather or when you’re moving house, you might need to pack your kit away carefully.
This process is known as ‘stowing’. Despite seeming complicated at first glance, stowing your Starlink equipment efficiently and safely can be achieved with just a few simple steps. In my guide below, I’ll cover all angles for you to navigate through every step of the process smoothly.
Preparing to Stow Your Starlink
Before we dive into the nitty-gritty details, it’s important to understand what we’re dealing with here.
Similar to packing away your outdoor grill or tidying up your garage tools for the winter, safely storing your Starlink equipment requires attentive preparation and a clear strategy.
Understanding Stow Starlink Basics
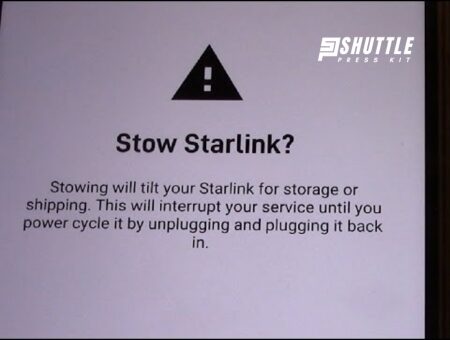
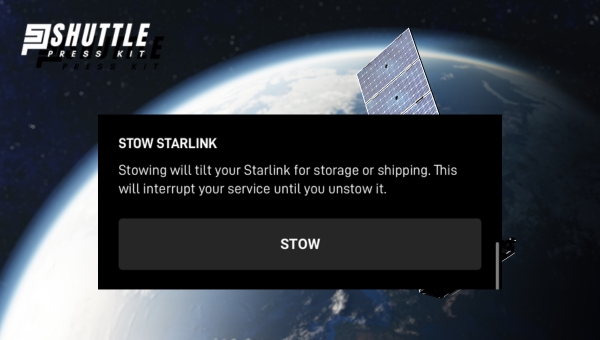
Let’s start by clarifying one thing: stowing is nothing more than fancy jargon for storing away. When we talk about stowing in regard to Starlink gear, we mean safely packing up and storing. Don’t worry; it sounds complex, but I assure you it’s easier than trying to beat your best score at Pac-Man!
When and Why You Would Need to Stow
You may wonder when exactly would be a good time to tuck your internet gear softly into its storage spot. Well, let’s think about this – do you leave out your finest china plates in a thunderstorm?
Probably not (unless you’re some porcelain thrill-seeker!). Similarly, when torrential downpours are hitting or wicked winds are whipping around, that might be a prime time for stowing!
Aside from nasty weather conditions, pack-up times could include periods of extended non-use — say during a vacation away — or if you’re planning on moving home anytime soon.
Also Read: Starlink Accessories Buying Guide: Ultimate Tips and Tricks
Step-by-Step Guide to Stow Starlink
No one likes tangled wires, misplaced chargers, or damaged equipment. That’s why knowing how to pack away your Starlink system properly is so important. So, let’s break down the process step by step.
Step 1: Safety First – Disconnecting Power
Before diving in, just like a responsible DIY-er would unplug an electric saw before changing the blade, we want to disconnect our Starlink from the power source first and foremost. Ensure that all components are unplugged from their respective power outlets. Safety first, and everything else will follow!
Step 2: Cleaning Up – Dealing With Cabling
Now comes a challenge: dealing with all those cables lying around. Untangling your headphones can be headache-inducing, but disentangling network cables? Next level! Don’t despair, though; it’s just about being orderly here – make sure you roll every cord gently (no yanking!), tie them up with cable ties, or reuse wire twists from some old bread loaves.
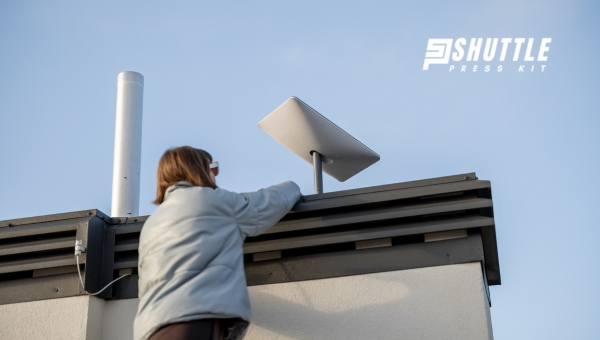
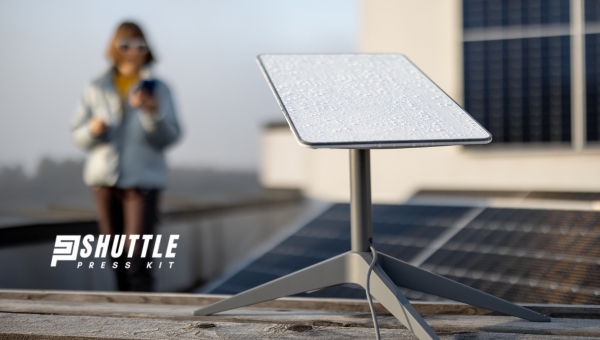
Step 3: Careful Hands – Detaching the Dish from Its Mount
This part gets a little hands-on! Removing your dish safely from its mount is paramount in preventing any undue damage (Remember, this thing was up connecting you to space internet!). It goes without saying. Be gentle while unscrewing it off its stand, and handle it as if you’re holding granny’s favorite china teapot!
Step 4: Finding the Right Spot – Selecting a Storage Location
We’ve got everything disconnected, wrapped up, and ready for its sleepy time now. But where do we put it? Like picking out your dog’s bed at the pet store, location is key! Somewhere cool (not cold) but dry should do nicely for our technological beauty here—as free from dust as possible, too.
Protecting Your Starlink While It’s Stowed
Once you’ve safely disconnected and packed away your Starlink, it’s crucial to keep it in tip-top shape while in storage.
Just like how you’d shield your comic book collection from fading due to sunlight or protect your grandma’s quilt from moths, maintaining the longevity of any valuable item requires careful foresight and appropriate measures.
Proper Storage Techniques
The first step towards protecting your equipment starts by selecting an ideal storage spot. The place should be dry, away from direct sunlight or heat sources, and gentle on the dish – think soft surfaces where it won’t get bumped or knocked around accidentally! It wouldn’t hurt to be a bit paranoid about keeping that dish cozy and comfortable!
Imagine if Buster Keaton got a hold of our Starlink dish on one of his classic film sets – disaster indeed! That should give you just enough incentive to find creative ways to cushion and support your kit patiently till needed again.
Preventative Measures Against Damage
The next crucial aspect is safeguarding against potential damage caused by dust, moisture, extreme temperatures, little critters, or basically anything that poses harm to electronics.
| Potential Damage Causes | Prevention Tips |
|---|---|
| Dust | Ensure the equipment is properly covered with a dust-proof material. Regular cleaning can also mitigate this issue. |
| Moisture | Store in a cool, dry area; avoid basements or spots with potential leaks. |
| Extreme Temperatures | Keep away from direct sunlight, which increases temperature over time; Rather not freeze your gear in icy garages, too! |
| Critters (Insects/ Rodents) | A secure container that critters can’t gnaw through would do just fine! |
I promise I’m not wishing for an Alfred Hitchcock’s “The Birds” situation here! But a little vigilance never hurt anyone when defending against our unexpected, unfriendly fellow critters. Remember, using these preventative measures definitively gives your stored Starlink a longer life span.
Also Read: Starlink Mounting Options – Your Ultimate Installation Guide
Common Concerns About Stowing Starlink Equipment
One might often wonder about the potential consequences of stowing their satellite equipment.
Two frequent questions are how to ensure optimal performance post-storage and how to handle firmware updates while your Starlink is stowed. But fear not! I’ve got you covered on both these fronts.
Ensuring Optimal Performance Post-Storing
After your Starlink equipment has been stored or moved around, the service must work just as efficiently as it did before. Re-calibration is vital in this process.
Start by setting up your kit at a spot with a clear view of the sky, then power up and reconnect to your computer or device. The satellite will automatically adjust itself to find the best signal strength, but remember: this process can take up to 15 minutes!
Managing Firmware Updates While Stowed
While your unit is stored away safely, it might miss out on several crucial firmware updates from SpaceX’s end. But there is no need for concern – there are two easy ways around this:
- Automatic Updates: When you power up and reconnect after storage, if available, any missed updates will download and install automatically.
- Manual Check-Up: In case there is an immediate update required or if there were too many updates missed while stowed,
you may have to manually check for an update through the user interface on your associated device.
Managing these common concerns ensures that when you’re ready to get back online with Starlink after stowage, everything will run as smoothly as ever. So don’t fret! Stow with confidence, knowing that you have all bases covered.
Also Read: How to Check Starlink Internet Speed using Availability Map?
Frequently Asked Questions
Are there any precautions I should take before I decide to stow my Starlink?
Ensure the device is disconnected from power before you start. Be careful when handling cables and the Dish. Lastly, always choose a safe dry location for storage.
How can I ensure my satellite dish stays secure while storing?
Securely pack away all loose parts in a box or bag and store it in a stable location where it won’t be knocked over or jostled.
Would my warranty be affected if I don’t store my device correctly?
Potentially, improper storage could lead to issues that may not be covered under warranty. Always follow recommended guidelines for best results.
Could storing affect signal strength once reinstalled?
No, reinstalling your device and allowing it some time for automatic calibration can restore optimal performance after storage.
What precautions should one take against dust and moisture during storage?
Keeping your equipment covered with breathable material well help protect against dust without trapping moisture which could cause damage.
Also Read: Starlink Accessories Buying Guide: Ultimate Tips and Tricks
Conclusion
Taking care of your high-tech Starlink gear propels you into a world of uninterrupted, high-speed internet. You’ll find the fantastic results from a few simple stow steps rewarding when the weather turns ugly or when you need to relocate.
By adhering to my storage guidance, including safe power disconnection, careful dish detachment, secure cabling, and well-considered location selection for storage, your Starlink’s performance will continue to impress post-storage.
Remember too that firmware updates are essential for ensuring smooth operation once you’re reconnected. Tending to your equipment guarantees its longevity and ensures the continuation of fast internet speeds upon reinstallation.