Are you considering getting Starlink’s game-changing satellite internet but scratching your head over how to set it up just right? Fret not! This article will guide you through the maze of Starlink Mounting Options, ensuring your path to super-fast broadband is as smooth as possible.
From official to aftermarket mounts, understanding how and where to perfectly perch your dish is critical for unbeatable connectivity—and I’m here to spill all those secrets.
When it comes time to install your shiny new Starlink dish, you’ll want it perched in the best spot and on the sturdiest mount. Whether it’s maximizing signal strength away from pesky obstructions or braving the whims of Mother Nature, choosing the correct mounting option can make or break your online experience.
And yes, there are plenty of choices—from the standard kit included with your dish to customized aftermarket solutions crafted for virtually any scenario.
Understanding Starlink Mounting Essentials
When you sign up for Starlink’s game-changing satellite internet, what happens next? You’ll need to figure out how to put that sleek dish in the best spot.
Let’s chat about the nuts and bolts – or the screws and mounts – of setting up your Starlink.
Official Starlink Mounting Options
Now, when you get your Starlink kit, you’ve got a few ways to fix it onto your place. We’re talking official gear here, straight from the horse’s mouth – yep, Starlink itself. They’ve got a variety of mounts to choose from, depending on where you want your setup.
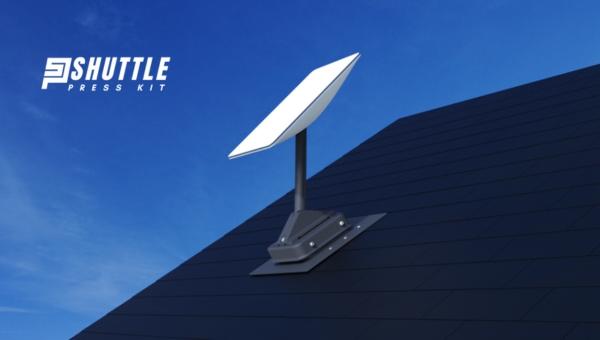
First off is the Volcano Mount. Picture this – a sleek little platform for your dish that sits right flat on the ground or on your roof. It’s pretty neat for flat surfaces and easy to install.
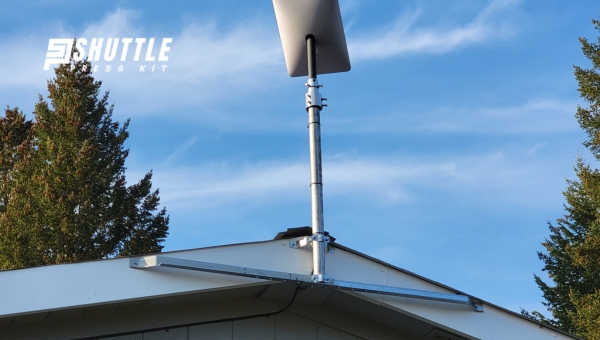
Then there’s the Ridgeline Mount; this one’s perfect when you’re looking at fitting it on top of your roof’s peak – like sitting pretty at the highest point! Plus, there’s also something called a Pipe Adapter – this baby lets you connect Starlink to existing poles or fixtures around your home.
Factors to Consider Before Installation
Alrighty then! Before drilling any holes or climbing any roofs with gear in hand, let’s think things through:
- Location: Where is this dish gonna live? You’ll need a clear view of the sky without pesky trees or buildings blocking its sight.
- Signal Strength: Get cozy with some science here because signal strengths hinge on how free and clear that view is.
- Obstacles: Be wary of obstacles near or around – these can be anything from tall structures to branches swaying in the breeze.
- Weather Conditions: If where you live is famous for throwing weather tantrums (I’m looking at you, Mother Nature), keep that in mind because tough winds can turn stuff upside down if not mounted properly.
By considering these factors before installation, you’re saving yourself time and headaches later down the road. Trust me; nothing beats getting it right first than having second thoughts when things go haywire during an epic season finale streaming marathon!
Also Read: Starlink Data Caps: Understanding Limits and Solutions
Official Starlink Mounting Options
Choosing the right mount for your Starlink satellite dish is like picking out the best spot for your new flat-screen TV.
It’s gotta be just right, or else you might not get to fully enjoy that high-speed, space-age internet Starlink brings. Let’s dig into the two types of mounts Starlink offers straight from their own box of gadgets.
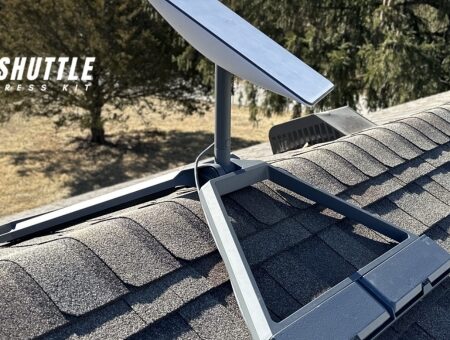
- Starlink Pivot Mount: Designed for slanted roofs, this mount provides a sturdy base for installing the Starlink dish securely. The pivot design allows for flexible adjustment to ensure optimal satellite signal reception even on angled surfaces.
- Starlink Flashing Mount: Ideal for metal flashing or metal roof shingles, this mount offers a secure attachment option without the need for drilling or penetrating the roof. It ensures a reliable and stable installation while preserving the integrity of the roofing material.
- Starlink Ridge Mounts: Providing a non-penetrating solution, these mounts are perfect for installations on rooftops with ridges. They offer a convenient way to securely mount the Starlink dish without damaging the roof’s surface.
Aftermarket Starlink Mounting Options
When you’re getting set up with Starlink, choosing the right mount for your satellite dish is a pretty big deal.
Now, let’s talk about the options that aren’t coming straight from Starlink itself – I mean the aftermarket mounts.
- Starlink Mounts for RVs: Specifically designed for recreational vehicles, these mounts offer a portable and versatile solution for setting up Starlink connectivity while on the move. They allow RV users to easily install and position their dishes to access high-speed internet wherever they travel.
- Tripod Mounts: Offering flexibility in positioning, tripod mounts are suitable for temporary or permanent installations. They provide stability and adjustability to optimize satellite signal reception in various outdoor settings, making them ideal for users seeking portable mounting options.
- Starlink Chimney Mounts: These mounts enable users to attach their Starlink dishes safely and securely to chimneys, offering an elevated position that can enhance satellite signal strength. They provide an alternative installation option that does not require drilling into walls or roofs.
Also Read: Can You Get A Static IP From Starlink? Find Out Here!
Installation Tips & Tricks
When it comes to getting your Starlink up and running, installing the dish might seem a bit daunting. But don’t freak out! With the right tips and a little elbow grease, you can totally do this yourself. Now, let’s dive into how you can make sure your Starlink connection is strong from the get-go.
DIY Installation Advice
So you’ve decided to roll up your sleeves and install your Starlink dish on your own. Here’s how to nail it the first time around:
- Pick Your Spot: First things first, find a spot with a clear view of the sky. Remember, tall trees, buildings – really any kind of blockage – can mess with your signal.
- Get Your Tools Ready: You’ll need some basics like screwdrivers, maybe a drill, and definitely that mounting kit that came with your dish.
- Follow Instructions To A T: This isn’t the time for guessing games. Follow Starlink’s guide step by step – they know what they’re talking about!
- Take It Slow: There’s no prize for finishing first. Take it one step at a time to ensure everything is secure and properly fitted.
- Safety First!: If you’re climbing ladders or on roofs, be super careful. Safety gear isn’t optional; it’s absolutely necessary.
- Test It Out: Once installed, give it some time for testing before putting away those tools – just in case you need to adjust anything.
And remember — if anything feels off or confusing, reach out to Starlink support or take advantage of online forums where others have shared their experiences.
Troubleshooting Common Issues With Starlink Mounting Options
Picture this: You’ve just gotten your hands on a shiny new Starlink kit. You imagine surfing the web at warp speeds, but there’s a snag — things aren’t as smooth as expected.

The culprit? Often, it’s a mounting issue that throws a spanner in the works. Let’s ease into fixing these little hiccups like we’re greasing wheels.
Resolving Alignment Problems
Okay, so your net’s chugging along slower than you hoped or dropping out entirely. It could be down to how your dish is pointing. Your dish needs to see the sky clearly, kind of like how Superman needs a clear view of the sun to charge up his superpowers.
First off, check that nothing’s blocking its line of sight—no trees doing an interception and no tall buildings playing keep away with your signal. If anything’s in the way – let’s move it or move our setup to get a clear sky.
Next up, it’s time to play Goldilocks with the positioning – not too high, not too low, but just right. Your Starlink app has an ace up its sleeve here; it’ll give you feedback on where and how best to align your dish for those sweet internet rays.
Remember though, while we’re all for the DIY spirit – messing around with tech can be tricky business if you’re not ready for it. If ever in doubt reach out; there are loads of pros ready and willing to lend a hand.
Also Read: How Long Does Starlink Take to Boot Up? Fast Boot Times Revealed
FAQs
What if there’s no clear area on my property to install the Starlink dish?
In cases where there’s no clear line of sight, rooftop mounts can be a solution, or you might consider a specialized service that provides heightened pole installations.
Can I install an aftermarket mount for my Starlink dish by myself?
Yes, with basic DIY skills and following the manufacturer’s instructions; however, ensure the mount is compatible and you have the necessary tools.
Are there any risks when using non-official mounting options for my Starlink dish?
Aftermarket mounts may void your warranty or not adhere to specific design standards of the official mounts – always evaluate build quality and compliance.
How often should I check the alignment of my satellite dish?
It’s recommended to check your dish’s alignment every few months, especially after severe weather events that could shift its position.
If I struggle with self-installation, where can I find professional assistance for mounting my Starlink dish?
Contact local satellite or telecommunications technicians who offer installation services; some may have experience with Starlink systems specifically.
Also Read: Setup Starlink: Quick & Easy Guide for Seamless Connectivity
Conclusion
Well, that about wraps it up! Choosing the right Starlink mounting options can make or break your satellite internet experience. From understanding the variety of mounts available to weighing in factors like location and weather, there’s plenty to consider.
Whether you go with an official mount for guaranteed compatibility or venture into aftermarket solutions for added flexibility and budget-friendliness, always prioritize a stable and clear connection.
Remember to maintain your setup diligently and don’t shy away from seeking professional help if needed. Stick to these tips, and you’ll be streaming at high speeds with reliable connectivity under the vast sky!