Are you tired of signal drops and flimsy setups for your internet? Want a steadfast connection without the hassle? You might need the Starlink Pipe Adapter in your life! Imagine having stable internet that doesn’t wobble every time the wind blows. That’s what this nifty gadget promises to do. But does it actually deliver? I took it upon myself to find out.
When you get a shiny new gadget, there’s that mix of excitement and dread – will it be easy to use, or will you end up screaming in frustration? Worry not! The Starlink Pipe Adapter is designed to hook up with your satellite dish in a snap, securing it so well you’ll forget about saggy connections once and for all. I’ll share exactly how I did it, along with my own thoughts on whether or not this adapter is worth your time.
Understanding the Starlink Pipe Adapter
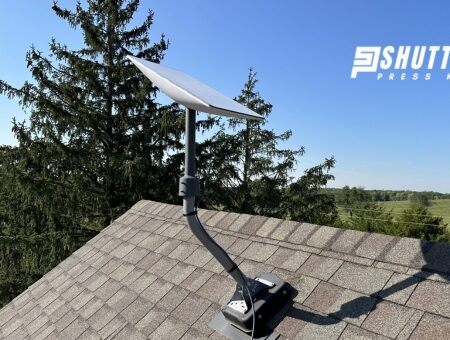
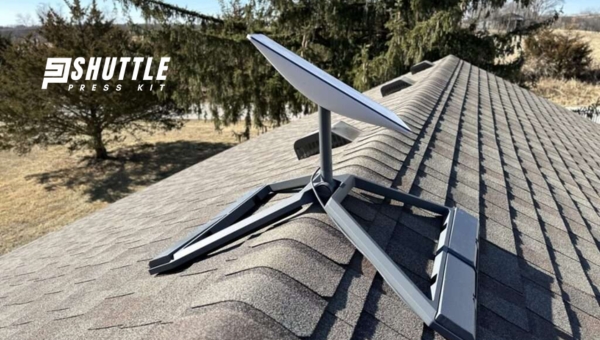
When you get a new gadget or a piece of equipment, you want to set it upright. For folks with a Starlink satellite, setting it up gets easier and stronger with something called a Starlink Pipe Adapter.
This adapter is quite important because it helps fix your satellite dish firmly in place.
What is a Starlink Pipe Adapter?
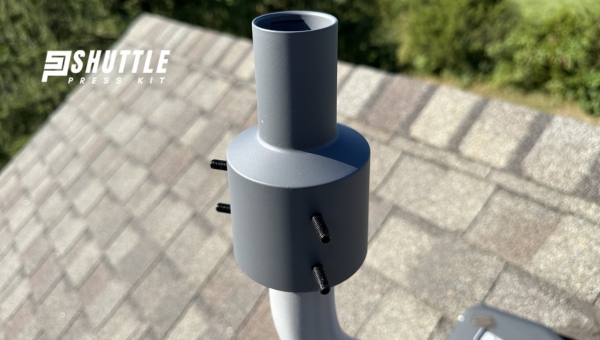
Simply put, the Starlink Pipe Adapter is a handy tool that helps you attach your satellite dish to an existing pipe or pole. It’s special because it’s made to fit perfectly with your Starlink dish. Without this adapter, attaching your dish might not be as secure or neat, as poles come in many sizes, and sometimes they don’t match up.
Benefits of Using a Starlink Pipe Adapter
Using the Starlink Pipe Adapter really makes setting up your satellite dish less of a headache. Here’s why:
- Solid fit: When you use this adapter, your satellite sits tight on the pole. No shaking means a better signal.
- Just right alignment: The way this thing is designed allows you to point your satellite exactly at the sky where it should be looking for signals.
- It’s simple: With an adapter like this one, anyone can fix their satellite onto a pole – no fancy skills needed.
- Faster setup: Doing things right often takes less time than fixing mistakes later on.
By using this little helper – the pipe adapter – you are making sure that your connection won’t cut out just when you’re in the middle of something important online.
Also Read: Starlink Data Caps: Understanding Limits and Solutions
Preparing for Installation
Before I start installing my Starlink satellite dish with the Starlink Pipe Adapter, I make sure to gather all the tools and materials I will need.
It’s also very important that I pick the best spot to set up my dish. This way, I can be sure that it will work well and give me a strong signal.
Required Tools and Materials
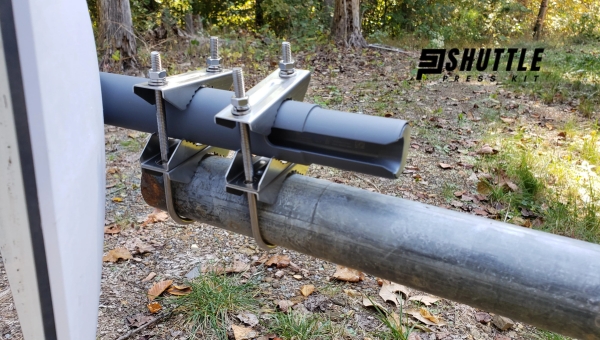
First things first, let’s talk about what you need to have on hand. To install this setup properly, you’ll need some basic tools like a wrench and screwdriver. But of course, the most important item is the Starlink Pipe Adapter itself. Here’s a simple list of what you should gather before getting started:
- The Starlink Pipe Adapter
- A compatible pipe or mast where the adapter will fit
- A wrench for tightening bolts
- A screwdriver for any screws involved in your setup
- Mounting hardware, which usually comes with your Starlink dish package
- Safety equipment, like gloves and glasses, if needed
Having these items ready makes your installation process smoother and keeps you from running back and forth looking for tools.
Choosing the Right Location
Choosing where to put up your Starlink dish isn’t just about finding a clear view of the sky; it’s also about making sure that spot works with your Starlink Pipe Adapter. Here’s how to pick an optimal location:
- Look for an area with a clear view of the sky – fewer obstructions mean better signal.
- Make sure there is enough space around so that anything nearby won’t bump into or move your dish.
- Check that there’s a suitable pipe or mast available where you can attach the pipe adapter securely without issues.
Remember, picking out just any old place won’t do – it needs to be just right so your satellite connection stays steady and strong!
Step-by-Step Installation Guide
Setting up your internet connection with the Starlink satellite dish can be exciting, especially when you have the right gear, like the Starlink Pipe Adapter. I’ll share how to install this adapter in simple steps. Let’s roll up our sleeves and get to work!
Unboxing and Understanding Components
When my Starlink Pipe Adapter arrived, it was time to open it up and see what’s inside. Here’s how I did it:
- Carefully cut along the taped edges.
- Gently open the box lid.
- Removed each piece and laid them out on a clean surface.
Inside, you’ll find a few key bits:
- The pipe adapter itself (that’s your star player)
- Bolts and nuts (they’ll help keep everything tight)
- Instructions (trust me, hang onto these)
It helps to match each part with what’s shown in the manual. That way, you know everything is there.
Mounting Your Dish with the Starlink Pipe Adapter
Now for the fun part – putting your dish up using that handy Starlink Pipe Adapter:
- First things first: Pick out where you want your dish to go.
- Attach the adapter securely to a pipe or pole – make sure it’s strong enough!
- With the bolts from earlier, fix your satellite dish onto this adapter.
Line everything up according to instructions so you get clear skies above (that means a better signal). Tighten those bolts; no wiggle room.
The trick is making sure all parts don’t move an inch once assembled – stability is key for good signal reception, after all!
Also Read: Setup Starlink: Quick & Easy Guide for Seamless Connectivity
Performance Assessment
After I got my Starlink Pipe Adapter installed, I really kept a close eye on how things went. There were two big things I was watching out for: first if the signal got better, and second, if the adapter could really last over time.
Post-installation Observations
Right after setting up the Starlink Pipe Adapter, the first thing that jumped out at me was how solid the signal became. No more on-and-off connections like before. It was clear that this little piece made a big difference. When it came to getting a better call, here’s what stood out:
- The connection didn’t drop as much.
- My internet felt faster.
This showed me that using the adapter wasn’t just some gimmick – it genuinely made my satellite dish work better.
Durability Over Time
Now, let’s talk about toughness – nobody wants something that falls apart in no time. From what I could tell looking at it and leaving it up there through some rough weather, this adapter is made of strong stuff:
- It didn’t rust or break even after some heavy rain and fierce winds.
- The material stayed in good shape – no cracks or weak spots.
These points gave me confidence this wasn’t just some cheap thing that would need replacing soon. It looked like whoever made this knew it had to handle all kinds of weather without giving up too easily.
Troubleshooting Common Issues
When you’ve got everything set up with your Starlink Pipe Adapter, sometimes things don’t go perfectly right away. It’s like when you plug in a lamp, but it doesn’t turn on—you have to check the basics and make some tweaks. Let’s look at a couple of common hiccups.
Aligning Your Dish Accurately
If your dish isn’t picking up a good signal, it might not be looking at the sky just right. To fix this, adjust the angle of your dish little by little until it gets the strongest signal.
It can be like finding that sweet spot on your pillow—you move around till it feels just right. If you’re using a Starlink Pipe Adapter, make sure everything’s nice and tight so that when you find that perfect angle, it stays put.
Handling Weather Concerns
Weather can be tricky when you’ve got tech outside. Imagine your dish is like someone wearing glasses in the rain—it gets all blurry and hard to see through! To cope with bad weather after setting up your Starlink system with a pipe adapter, here’s what I suggest:
Firstly, check for any loose parts—make sure they’re securely fastened so wind or rain doesn’t throw things off balance. And if snow or ice are issues for you, regularly clear them off—the same way you’d brush snow off your car before driving.
Also Read: How Long Does Starlink Take to Boot Up? Fast Boot Times Revealed
Frequently Asked Questions
Are there different sizes of Starlink Pipe Adapters?
Yes, there are different sizes to fit various mounting poles.
Can I install the Starlink Pipe Adapter by myself?
Yes, you can install it yourself with basic tools and a careful read through the installation guide.
What if my dish isn’t receiving signals properly after using the adapter?
Check your alignment; slight adjustments can make a big difference in signal reception.
Does weather affect satellite reception with a pipe adapter?
The Starlink system is designed to withstand normal weather conditions, but extreme weather may impact reception temporarily.
Also Read: Unraveling Starlink Portability: A Gateway to Internet Anywhere
Conclusion
After going through everything from what the Starlink Pipe Adapter is to installing and reviewing its performance, it’s clear that this little piece of hardware can make a big difference.
It’s about more than just getting your satellite dish up; it’s about making sure it stays there, stable and straight. Mounting the dish with the adapter improves stability and signal reliability.
Even though I was a bit concerned about alignment and weather conditions initially, my concerns were put to rest once I saw how well the adapter held up over time. It handled wind and rain like a champ! For anyone looking to ensure their Starlink satellite system performs at its best, this adapter is definitely worth considering.