Have you ever thought about the need to turn off the motors of your Starlink antenna? Maybe you’ve heard that disabling them could potentially increase its lifespan or maybe you’re just curious about how it’s done. Don’t worry; I’ve got you covered. Disabling these motors might seem complex, but I promise, it’s easier than you think.
In today’s guide, we’re diving into a simple yet effective method on how to disable the Starlink antenna motors. Whether it’s for maintenance purposes or just out of curiosity, knowing how to manage your tech equipment is always beneficial. Grab a cup of coffee and get ready for some insightful tips that will demystify this process for you!
Reasons to Disable Antenna Motors
If you’re using a Starlink antenna, you might wonder why someone would want to turn off the motors in their antenna.
There are a few reasons folks might do this. Let’s look into them.
- Preventing Wear and Tear: When something moves a lot over time, pieces inside it can start getting worn out. It’s like how a door hinge gets squeaky when it’s used a lot. If I keep my antenna motors from moving too much, I can stop them from wearing out too soon.
- Power Saving Measures: Sometimes people need to save power, maybe because they’re somewhere with very limited electricity. When I turn off my antenna motors, won’t use as much power – which is great if saving energy is important where you are.
- Stationary Deployment Situations: There are times when an antenna doesn’t need to move at all because it’s got nothing blocking its view of the sky or the environment is calm with no winds or storms that would shake it around.
In cases like these, stopping those motors makes sense since they don’t have work to do keeping the signal clear.
Also Read: Guide to Stow Your Starlink: The Art of Satellite Setup
Equipment Required to Disable Starlink Antenna Motors
Disabling the motors of a Starlink antenna may be necessary for various reasons, including maintenance, troubleshooting, or repurposing the device. It’s important to approach this task with caution and the right tools to avoid damaging the antenna. Below the essential equipment needed for this process:
- Drill: A power drill is required to remove or loosen any screws that are securing the housing of the antenna. This is the first step in gaining access to the internal components where the motors are located.
- Tweezers: Precise tweezers are beneficial for handling small or delicate parts inside the antenna, especially when disconnecting fragile wiring connectors that may be attached to motor components.
- Rubber Grommet: This is used to seal any openings or adjustments made during your work on the antenna. Ensuring a tight seal is crucial for preventing moisture or debris from entering and potentially damaging internal components.
- Sealant: High-quality waterproof sealant will further prevent ingress of water and debris following reassembly, maintaining the integrity of your antenna in various environmental conditions.
- 7/8″ Drill Bit: A drill bit of this size might be necessary if creating new holes for disabling mechanisms or rerouting cables away from motorized parts is part of your disassembly process. Ensure accuracy and caution while drilling to avoid damage.
Also Read: Starlink Dish Placement: Optimal Tips for Perfect Setup
Step-by-Step Guide to Disable The Starlink Antenna Motors
Disabling the motors of your Starlink antenna might be a necessary step for various reasons, including reducing wear or conducting specific adjustments.
While it’s a technically involved process, with attention to detail and safety precautions in place, it can be done at home. Here is a clear, concise guide on how to disable the motors within your Starlink dish:
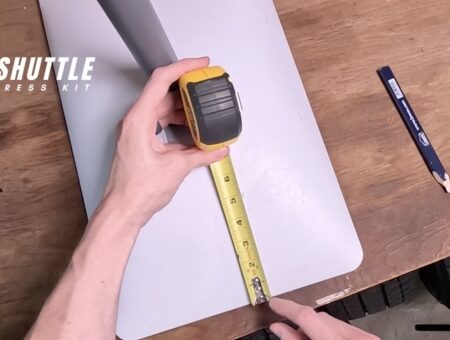
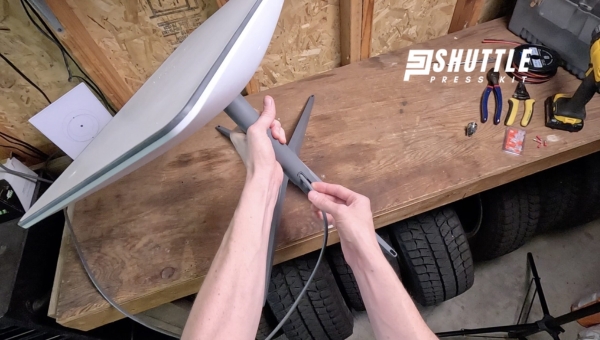
- Step 1: Power Down and Position the Dish: Begin by shutting down your Starlink dish and waiting until it aligns vertically. This position facilitates easier access for modifications. Once the dish has fully adjusted to an upright stance, disconnect it from its power source before proceeding with any physical alterations.
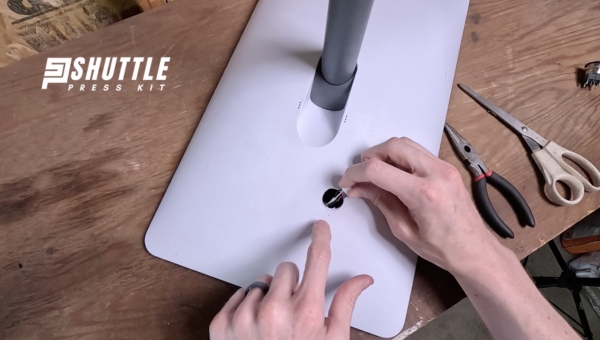
- Step 2: Marking and Drilling an Access Hole: Position your dish face-down on a stable surface to locate where you’ll cut an access hole. A practical point for this hole is around 5 inches off both the bottom edge and side upon looking at the underside of the dish. Mark this spot carefully. Employing either a spade bit or another appropriate cutting tool, create an access point taking care not to penetrate too deeply and damage internal components.
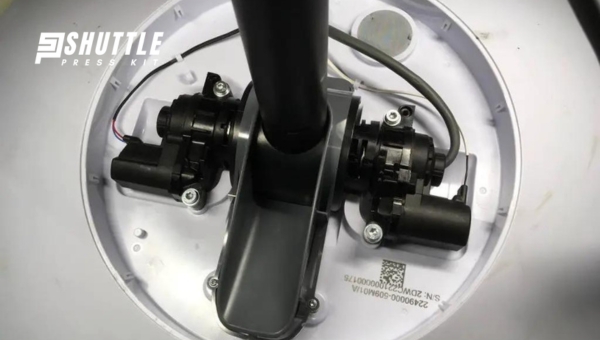
- Step 3: Disconnect Motor Connector: With access now available through the hole you’ve created, locate the motor connector inside—characterized by wires in white, black (controlling one motor), red, and blue (controlling another motor). Carefully unplug this connector using a suitable tool like a tweezer without tampering with any other internal connections.
- Step 4: Ensuring Functional Modification: If desiring reversibility or control over this modification (e.g., switching between enabled/disabled states), consider wiring a DPST switch into the circuitry by intercepting one wire from each motor pair (red from one pair; black from another) for connection to respective switch poles.
- Step 5: Sealing Your Work Area: To finalize this process securely and safely restore integrity against environmental factors like moisture infiltration; find a rubber grommet matching your drill bit’s size used for creating that initial access point. Apply sealant around this grommet before inserting into place over or within the drilled hole ensuring that no gaps are left exposed.
Following these steps allows you to temporarily disable movement functions of your Starlink antenna while maintaining overall operational capabilities unaffected unless otherwise modified as outlined herein—greatly influencing potential custom setups or fixed usage scenarios as per user-defined needs/preferences without impeding dome-unrelated features/service aspects.
Technical Considerations
When I think about making changes to something like the Starlink antenna, two big things come to mind if I must be careful about the warranty and how well it will work afterward.
These are important because they can affect not just how I use my internet but also my relationship with the company, SpaceX.
Warranty Implications
Firstly, let’s talk about warranty implications. A warranty is like a promise that if something goes wrong with your product when you’re not at fault, the company will help fix it. But if I decide to disable the Starlink antenna motors myself, this might change things.
Think of it this way – if you buy a new phone and then take it apart to change something inside, you can. expect the phone company to fix it for free if something goes wrong later. In much the same way, messing around with your Starlink antenna could mean that SpaceX won’t cover repairs under warranty anymore.
Impact on Service Quality
Now let’s move on to how changing your antenna could mess with your service quality. The whole point of an antenna moving around is so it can find and keep a strong signal from satellites up in space – which gives you good internet speed.
If I stop those motors from moving (make them stay still), my Starlink might not work as well because it isn’t following those satellites like before. It’s sort of like trying to talk to someone on a walkie-talkie but standing in a spot where their voice can barely reach you – chances are you won’t have a clear conversation.
Also important here is knowing how to safely turn off these motors without doing any harm Now and then, companies send out updates – called firmware – that make changes or improvements to our devices. Any method I use should fit within what’s allowed by these updates so as no, anything or make matters worse.
In short for this part, before making any changes such as trying to disable The Starlink Antenna Motors, think hard about whether saving some wear and tear or electricity is worth possibly voiding a warranty or having less dependable internet. It’s all about weighing up what matters most for your situation and using your equipment wisely within SpaceX’s rules.
Also Read: Bypass the Starlink Router: Ultimate Easy Steps Guide
Frequently Asked Questions
*Do you need insurance for your drone business?
Yes, having insurance for your drone business is important. It protects against risks like damage and liability claims.
When don’t you need drone coverage?
You might skip drone coverage if you’re flying only indoors or in an isolated area where there’s no risk to people or property.
What is personal drone insurance?
Personal drone insurance covers the risk of recreational flying, guarding against accidents and damage when flying for fun.
What is commercial drone insurance?
Commercial drone insurance is for professional use, safeguarding your business from liability and covering operating risks.
Also Read: Best Aftermarket Wifi Routers For Starlink: Top Picks!
Conclusion
I understand that you may want to disable the Starlink antenna motors for reasons like saving power or preventing wear and tear. Doing so could also be helpful when your dish is in a stationary setting with no need for realignment.
I’ve walked you through how to get this done, considering both manual and software methods. However, remember that modifying your antenna could impact your service quality and potentially affect your warranty. So it’s important to weigh these factors carefully.
If after disabling the motors you find yourself facing any issues, don’t hesitate to reach out for support or refer back to this guide to re-enable the motor functions. Remember, maintaining optimal use of your Starlink system while staying within SpaceX’s operational guidelines ensures the best experience.