Have you ever thought about getting super-fast internet but got stuck with the setup part? Well, not anymore! The Starlink Cable Routing Kit is here to solve your troubles. Imagine a space-age internet service that zooms into your home without any unsightly wires spoiling the look.
I’m here to tell you all about this nifty little package that promises to make the setup as smooth as a spaceship gliding through space. Keep reading, and I’ll guide you on how to get those cables out of sight and into action.
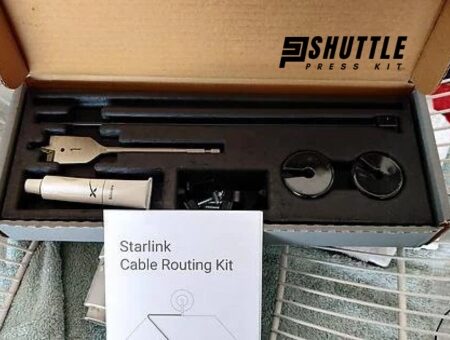
If you’ve ever wondered what’s inside the Starlink Cable Routing Kit and how it helps tidy up your space, let me break it down for you. This kit includes everything you need to tuck away those pesky cables and keep everything looking neat and tidy while ensuring the optimum functionality of your satellite internet connection.
With user-friendly components designed for easy installation, even if you’re not a DIY pro, this little box of wonders is all set to empower you with clutter-free connectivity.
All About Starlink Cable Routing Kit
The moment I came across the Starlink Cable Routing Kit, I was highly intrigued. When it comes to satellite internet setups, organized and secured cabling is vital. Here’s where this kit steps in.

Design and Purpose
The Starlink Cable Routing Kit is designed to provide an easy and safe way to route cables in your home or office.
This kit contains everything needed for a successful installation, starting from the actual cables right through mounting brackets and cable shields. Its design is based on practicality; it addresses all challenges one might face during cable routing, like wall penetration or outdoor-to-indoor transitioning.
The whole purpose of this well-thought-out package is to give you access to top-tier internet with minimal fuss from SpaceX’s Starlink satellites. The kit allows for efficient cable management, thereby promoting safety while boosting the aesthetics of your surroundings.
Also Read: Guide to Stow Your Starlink: The Art of Satellite Setup
Starlink Cable Routing Kit Content
Before we dive in and unravel the content of a typical Starlink Cable Routing Kit, it’s worth mentioning that this kit is expertly crafted for easy installation, versatility, and durability.
When getting down to unpack my Starlink Cable Routing Kit, I was pleased to see an assortment of items designed with utmost precision. Here’s a comprehensive list of what you can expect to find:
- Starlink Dish: The most important piece that receives signals from space.
- Mounting Equipment: For securing the dish in your preferred location.
- Power Supply Unit: This helps keep your satellite connection up and running.
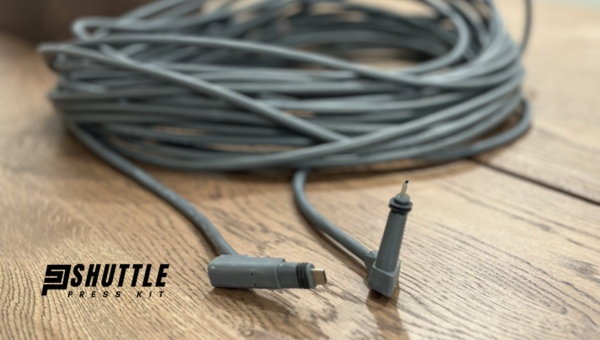
- Cables: This includes both Ethernet cables for internet connection and power cables for electricity supply.
- Accessory Toolset: The kit also comes packed with handy tools needed during installation.
With all these contents neatly packed within one box, I had everything necessary to jump into the task right away!
How to Use Them?
The key resides not just in knowing what each piece does but also in understanding how they come together for a successful installation.
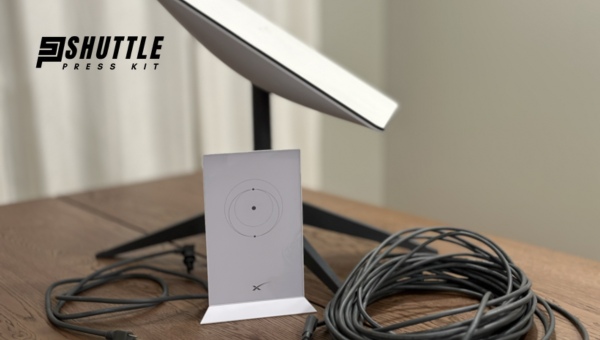
- The first step involves setting up the Starlink dish. Carefully pick a spot with an unobstructed view of the sky (preferably outdoors) because it must be able to connect efficiently with satellites passing overhead.
- Next is the mounting equipment. These can be either screws or clamps used in securing your dish properly onto its base stand so it’ll point accurately towards space without moving or falling over, even when gusty winds hit hard against it!
- As soon as you’ve secured the dish correctly, attach the provided Ethernet cable from this satellite device right into your home router so you’ll have internet flowing smoothly through every corner at home like water from taps!
- Ensure the power supply unit, which works somewhat similar to a regular plug in our homes, is connected both to the Starlink dish and a functioning power outlet. This keeps the energy pulsing through our satellite connection.
- Lastly, the accessory toolset at your disposal are there to assist you through this process. Each tool has a specific purpose – from tightening screws to connecting cables – so use them wisely to ensure every piece fits perfectly where it’s meant to be!
Just remember, every piece of equipment in the Starlink Cable Routing Kit is designed for a purpose, and they all work together like cogs in one giant machine called the Internet!
Also Read: Guide to Stow Your Starlink: The Art of Satellite Setup
Acquainting Yourself with the Tools Required
Before one can successfully install a Starlink Cable Routing Kit, it’s important to familiarize oneself with the necessary tools. Having these tools within handy reach will make the installation process much smoother and more efficient.
Tools List
Here are some of the commonly used tools for installing a Starlink cable routing kit:
- Drill: You will need this to create pilot holes on your wall for cable routing.
- Screwdriver set: Used to tighten or loosen screws during installation.
- Tape Measure: To accurately measure distances for precise placement of equipment.
- Wire cutter/Stripper: This is needed to adjust the length of your cables and expose wire ends for connecting purposes.
- Level tool: Helps ensure straight placement of bolt holes and mounted equipment.
Don’t forget to gather all these tools before starting your installation project. This way, you won’t have to search frantically in the middle of an important step!
Safety Precautions
As much as we want our installations to be successful, it’s paramount that we prioritize safety throughout our execution. When using these tools, it’s essential to adhere to some safety protocols:
- Wear Protective Gear: Include gloves, safety glasses, and, if possible, a helmet – especially when handling drills or operating near electrical installations.
- Use Insulated Tools /Check Power Supply: Always check the power supply before working on any task that involves electricity. An insulated tool reduces the risk of electric shock.
- Do Not Use Damaged Tools: Inspect all your tools prior to usage; faulty or damaged equipment may cause serious accidents!
- Keep Work Area Clean: Messy areas can lead to unnecessary trips or falls.
Taking time out beforehand and acquainting yourself with the required tools and relevant safety precautions goes a long way in ensuring not just successful but safe execution as well!
Executing The Actual Installation of Your Starlink Cable Routing Kit
Installation of a Starlink Cable Routing Kit can seem like a daunting task. However, with proper preparation and understanding of each step involved, it becomes quite manageable. Let’s walk you through these steps.
Preparation Process
I always find that a good preparation process is key when getting ready to install my Starlink cable routing kit. Before I get started, I make sure all the components of the kit are present and in good condition. This helps me avoid any unforeseen hitches during the installation process.
From Drill Pilot Hole To Interior And Exterior Holes
Drilling pilot holes is particularly important. These initial holes help guide my drill, providing me with greater control and reducing the potential for error as I move to interior and exterior holes.
Here’s how I do it:
- Locate & Mark Spots: First, locate where you want your cables to go through and mark with a pencil.
- Secure Your Drill Bit: Attach a small drill bit to your handheld drill.
- Drill The Pilot Holes: Proceed to create every pilot hole at each marked spot.
- Attach Larger Drill Bit: Switch out your small bit with a larger one suitable for the real interior or exterior hole.
- Drill The Real Holes: Now your device has guides from which you can securely drill larger holes without slipping.
Successfully Routing The Starlink Cable Through Wall
I give much attention here. Routing cables through the wall could be tricky but made simpler (and thrilling) when done systematically.
The step-by-step method includes:
- Run a steel fish tape through one opening in your wall until it extends out of the final exit point.
- Attach the end of your cable onto this extending fish tape end; this could be done with electrical tape.
- Moving back to the initial opening where you inserted your fish tape, start pulling gently until your intended cable now stretches from point A to B through that wall.
Managing Your Cables Neatly To Avoid Clutter And Accidents
Having neatly bundled cables can’t be overstated. Apart from looking tidy and orderly, it reduces the chances of accidents significantly. Always have zip ties and cable clips to hold your cables together while ensuring they remain straight and not twisted.
Installing Grommets For A Polished Finish
Finally, in my installation process comes the grommet installation – this gives an assured finish for the Starlink cable routing kit.
Grommets protect your cables against wear due to friction with rough edges in drilled holes. Push these rubber or plastic rings into each hole after feeding your cable through. This ensures a longer lifespan for my setup.
With all these steps followed carefully, I achieved an efficient installment of my Starlink Cable Routing Kit without hassle or complications.
Also Read: Bypass the Starlink Router: Ultimate Easy Steps Guide
FAQs
How do I route my Starlink cable to my house?
Routing the Starlink cable to your house involves several steps, including identifying the appropriate entry point and drilling a pilot hole from inside before moving outside for the actual hole. Then, you should pass the Starlink cable from outside through the drilled path indoors.
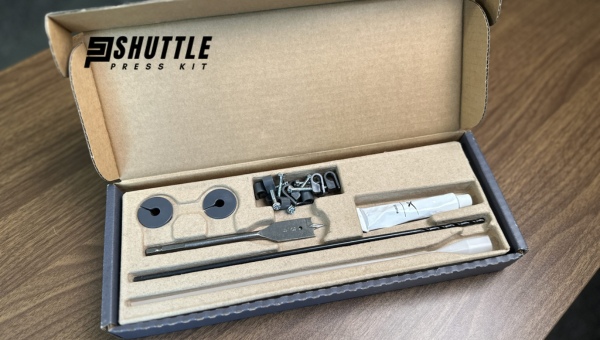
What comes in the Starlink cable routing kit?
The Starlink cable routing kit includes essential items such as wall clips, nail-in clips for round cables, and adhesive-backed mounts. It also contains zip ties for securing the wire correctly and a grommet for finishing off your work with a polished look.
How big of a hole do you need to drill for a Starlink cable?
The size of the hole you need to drill for your Starlink Cable would depend on its diameter. However, it’s generally recommended that you create a 3/8″ hole if using round cables or 1/4″ if flat.
Can I install Starlink myself?
Yes! With some basic tools like electric drills and screwdrivers along with carefully following installation instructions—which include making sure power outlets and grounding methods are close enough—you can successfully install your personal home-use satellite internet system.
Also Read: Starlink Travel Case Review: Must-Have Accessory?
Conclusion
The Starlink Cable Routing Kit is an incredible innovation designed to make internet connectivity hassle-free and efficient. It offers a simple solution to achieve a neat setup for your cable system by providing all that you need and clear guidelines to follow through.
However, despite the simplicity of the kit, we must approach its installation wisely by understanding all its components and their usage thoroughly. Safety precautions are also not to be overlooked during the installation phase.
What is the overall takeaway from my experience with this product? It’s an investment worth making if you’re seeking reliable internet connectivity with an easy-to-manage setup.