Hooked on the idea of space-age internet access? Swept up by dreams of unmatched download speeds from the heavens above? Well, you’re not alone in your lofty aspirations. The promise of high-speed internet powered by satellites has turned many eyes skyward, seeking out Starlink.
Right off the bat, let me introduce you to everything you’ll find inside a standard actuated Starlink kit because it’s important to know what gears are working behind the scenes of this cosmic connectivity.
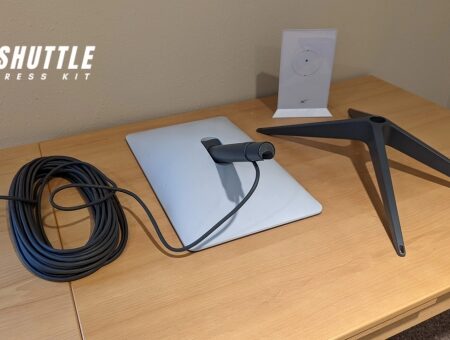
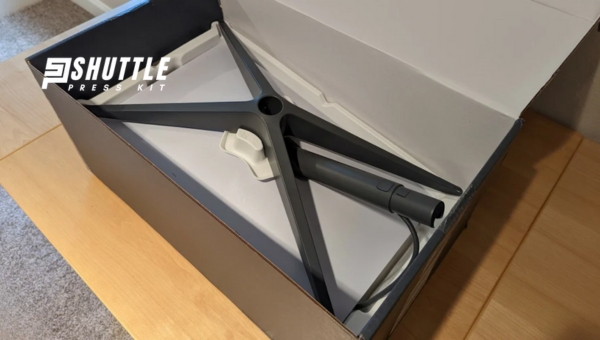
Once that futuristic box lands in your hands, ripping into a standard actuated Starlink kit unveils several treasures. First and foremost is the Starlink dish—your personal portal to satellites whizzing past overhead. Supporting this dish is a sleek tripod stand designed for easy setup.
Then there’s a Wi-Fi router that connects seamlessly with your new sky-high service as well as necessary power cables plus an ethernet cable—because let’s keep our options open! All these components work harmoniously to transport you into a realm where buffering icons become relics of a slower-paced past.
Unboxing the Starlink Kit
Ah, the moment has arrived! You’ve heard all about it, and now you’ve got your hands on your very own Standard Actuated Starlink Kit.
Let me tell you, this isn’t just any box; cracking it open feels like stepping into the future of internet connectivity. So what’s inside this prized package?
What to Expect Inside the Box?
When you order your Starlink Kit, it will come with all the essentials needed to set up and enjoy your new internet connection. Here’s what you can typically expect to find inside the box upon delivery:
- Starlink Dish: Also known as Dishy McFlatface by enthusiasts, this is the primary satellite antenna that connects you to the Starlink satellite network.
- Mounting Tripod: A sturdy base designed for quick and easy setup of your Starlink Dish. This tripod is suitable for ground-level installations on a variety of surfaces.
- Wi-Fi Router: The device that provides wireless connectivity within your home or office, allowing multiple gadgets to connect to the internet through the Starlink system.
- Power Supply: Essential for powering your dish and router, this power brick ensures everything runs smoothly.
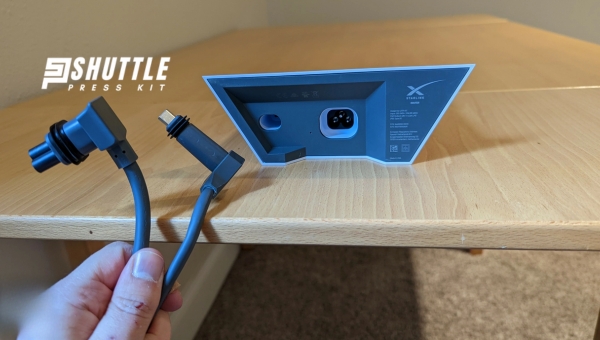
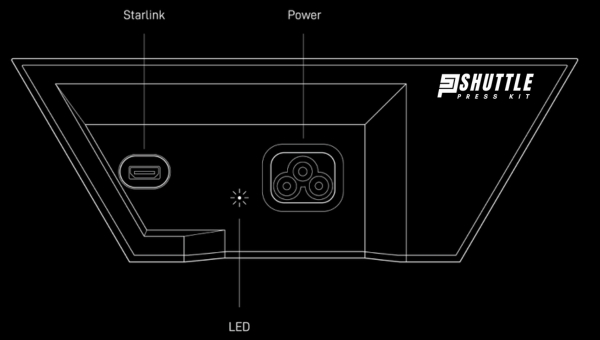
- Cables: The kit includes cables that connect all components—the power supply cable, and a long outdoor-rated cable connecting the dish to your Wi-Fi router.
Always remember that contents may evolve over time with newer versions or in different regions; always refer to official communication from SpaceX regarding current packaging details.
First Impressions and Build Quality
Let’s talk build quality because when I first got my hands on these components…wow! The entire kit feels solidly built and durable enough for an outdoor life under the vast sky – just ensure Dishy gets a clear view for the best results!
Style-wise, everything is so clean and modern looking that having Dishy sitting on my lawn almost feels like I’m showing off an art installation rather than just picking up wi-fi signals.
Also Read: Starlink Port Forwarding Guide: Steps for Secure Connections
Setting Up Your Starlink Connection
Picture this: you just got your hands on that shiny new Standard Actuated Starlink Kit, and you’re itching to jump into hyperspeed internet action.
Let’s go through the whole setup process together, so in no time flat, you’ll be surfing the web at stellar speeds.
Step-by-Step Setup Process
Opening up the box is like Christmas morning, but before we get caught up in the excitement, let’s walk through getting this baby up and running. Here’s how it goes down:
- Unbox with Care: Gently take each piece out of the box. You’ll see a sleek satellite dish that seems like it belongs on a spaceship – this is your ticket to blazing-fast internet.
- Find the Perfect Spot: Scout out a clear area for your dish with an unobstructed view of the sky because buildings and trees are no friends of satellite signals.
- Get Grounded (literally): Place that tripod stand firmly on level ground—or wherever makes sense for your space.
- Dish It Out: Fit the dish onto its stand; it should click right into place—if not, give it another whirl but keep it gentle!
- Power Up!: Run that cable from the dish to your Wi-Fi router and connect it to power so you’ve got juice.
- Seeing Stars?: If all lights are on and things look good, give yourself a pat on the back – we’re almost there!
This nifty kit has made things pretty straightforward – like putting together one of those Swedish furniture pieces, only easier (and without those dreaded leftover parts).
Starlink Activation and Network Configuration
Starlink offers high-speed, low-latency broadband internet in areas where access has been unreliable or completely unavailable. By utilizing a constellation of satellites in low Earth orbit, Starlink provides users with a new way of connecting to the internet.
Below are the general steps you’d typically need to follow to activate your Starlink service and configure your network:
- Locate Clear View of Sky: Position the Starlink dish at a site with a clear view of the sky, free from obstructions such as trees, buildings, or other barriers.
- Install Starlink App: Download the official “Starlink” app available on iOS or Android devices. This app will guide you through the best placement for reception and aid in network configuration.
- Set Up Dish and Equipment: Follow the instructions provided by the Starlink Kit to assemble and set up your dish and base station. Power on your equipment once connected properly.
- Connect to WiFi Network: On your smartphone or tablet, connect to the default Wi-Fi network emitted by Starlink’s router.
- Open Starlink App for Setup: With the app opened on your device, finalize alignment if necessary based on guidance from within the application.
- Configure Your Network Settings: Through the app, adjust your Wi-Fi name (SSID) and password as preferred to secure your home network.
Remember that these steps are meant as a general guide; actual procedures may vary slightly based on updates from SpaceX/Starling regarding their equipment or software.
Also Read: How to Access Starlink Router Settings? – Easy Guide
Important Technical Specifications
When we’re talking about the revolutionary technology packed into the Standard Actuated Starlink Kit, it’s crucial to zero in on what’s under the hood and how it performs.
This isn’t just about plugging in a gadget; we’re diving into what makes this kit a standout contender in the race for superior internet access.
Performance Expectations
So, here’s the nitty-gritty on performance. When you set this baby up, you’re stepping into a realm of high-speed internet that laughs in the face of your traditional broadband. With standard actuators ensuring precise alignment to satellites whizzing around Earth, here are some speed and latency digits worth noting:
- Expect download speeds that can range from 100 Mbps to 200 Mbps, which means buffering screens are now relics of your past.
- Upload speeds keep pace at about 20 Mbps to 40 Mbps, making your video uploads smoother than a hot knife through butter.
- Latency figures stand out too – they’re typically within 20ms to 40ms. For us non-techie folks, let’s just say that’s blink-and-you’ll-miss-it fast!
Simply put, if you’ve been craving internet that moves at lightning speed and is more dependable than your morning coffee, this setup has got your back.
Durability and Maintenance Advice
Now onto durability – because what good is top-notch tech if it can’t handle a little roughing up by Mother Nature? This kit isn’t just built smart; it’s built tough:
- Every piece is designed with weather resistance in mind, from scorching sunshine to freezing blizzards.
- It’s got resilience against wind built-in so that even when gusts pick up, your connection remains steadfast.
But hey, nothing lasts forever without a bit of TLC. Here are some maintenance tips I must toss your way:
- Give the dish an occasional once-over for debris or nesting critters (they love warm places).
- Ensure all cables are snug and secure – loose connections don’t do anyone any favors.
- Perform software updates when prompted by the app; think of them as vitamins for your system’s health.
While this bit of tech marvel can fend off surprises from above and below, keeping an eye out will help prolong its life span. Treat it right and enjoy uninterrupted connectivity come rain or shine (or snow!).
Also Read: Starlink Roam vs Starlink Residential: What’s Best for You?
FAQs
How difficult is it to set up the Standard Actuated Starlink Kit?
It’s not difficult at all! The kit includes everything you need, and the setup process is designed to be user-friendly with a helpful app guide.
Does the Standard Actuated Starlink Kit require professional installation?
Nope, professional installation isn’t necessary. You can install it yourself by following the straightforward instructions provided.
Can I use my own router with the Standard Actuated Starlink Kit?
Absolutely! While Starlink comes with its own Wi-Fi router, you can use your own if it’s more to your liking or needs.
How does inclement weather affect Starlink’s connection stability?
Like all satellite services, severe weather may impact connection quality temporarily, but Starlink is engineered to be resilient in various weather conditions.
Are there hidden costs beyond purchasing the initial kit?
After purchasing your kit, you’ll just have regular service plan fees without extra hidden costs; just make sure to pick a plan that suits your needs.
Also Read: Starlink Maritime: Revolutionizing Connectivity at Sea
Conclusion
I’ve got to say that the Starlink experience is quite something. From unboxing to installation and enjoying high-speed internet, the journey has been pretty straightforward. The standard actuated Starlink kit is more than just a bunch of tech; it’s a gateway to consistent and fast internet, no matter where you are.
Managing the setup myself proved simpler than I expected – and that’s saying something! Sure, it’s an investment upfront with ongoing costs for premium connectivity, but for those of us craving reliable internet in remote spots? It’s absolutely worth considering. Plus, with weather-resistant durability built right into its design, this kit isn’t just smart; it’s tough too!